
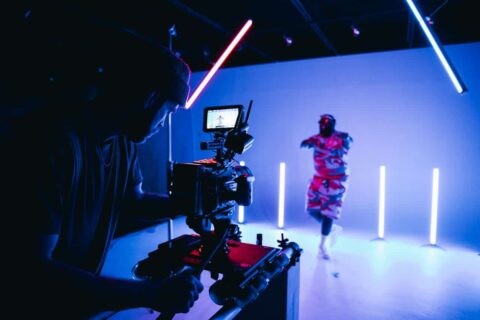
Lighting plays a huge role in video production. It can make or break your video, impacting how professional and engaging it looks to viewers. Good lighting not only highlights the subject of your video but also sets the mood and draws the audience in. Think about your favorite movies or TV shows. The way they capture light changes everything, from making a scene feel intimate and warm to action-packed and thrilling. Without the proper lighting, even the best video content can fall flat.
When you think about setting up a video shoot, you might not immediately consider renting a green screen. Yet, it plays a significant part in achieving the perfect look for your video using lighting. Green screens let you have complete control over your background, which means your lighting setup can focus on illuminating subjects in the best way possible. With the right lighting, you avoid unwanted shadows and get that seamless blend between your subject and any virtual background, making the entire video production look polished and complete.
Understanding Different Types of Lighting
To kick off your lighting setup, you’ll want to understand the different types of lighting available. Each type brings its own vibe and benefit to video production.
– Natural Lighting: This is the sunlight streaming through windows or any natural source. It’s free and can add a soft, beautiful glow to your videos. However, it’s challenging to rely on because it’s inconsistent. Overcast days or rapidly changing light conditions can mess up your shot.
– Artificial Lighting: This is all the gear you buy or rent that’s designed to help you control the light in your videos. The main advantage is consistency. You can have perfect lighting anytime, day or night. But, it can be expensive and sometimes requires more setup.
Next, let’s look into the three-point lighting technique:
1. Key Light: The primary source of light for your subject. It serves as your main illumination and focuses directly on your subject to create shadows and highlights.
2. Fill Light: This light helps balance the shadows cast by the key light. It softens shadows and evens out the overall light on your subject. This light is less powerful than the key light.
3. Back Light: Positioned behind the subject, the back light separates them from the background, adding depth and preventing your video from looking flat.
Lastly, there’s specialty lighting. If you want to give your videos that extra touch, consider using softboxes for diffused lighting, ring lights for an even glow primarily for faces, or LED panels which are versatile and energy-efficient. Each of these options provides unique advantages, perfect for different shooting scenarios.
Understanding these details ensures that you have all the tools to perfect the lighting in your videos, bringing your creative vision to life.
Setting Up Your Lighting for Green Screen Usage
When using a green screen, getting the lighting right is super important for creating that perfect video magic. The green screen lets you transform your video backgrounds effortlessly, but poor lighting can create pesky shadows and reflections that ruin the effect. Your main goal with lighting here is to eliminate shadows, as they can interfere with the editing process.
To light a green screen effectively, follow these steps:
– Position Lights Evenly: Place lights on either side of the screen. This avoids any dark spots and helps in getting a uniform color, which is crucial when you edit.
– Adjust Intensity: Make sure the lights aren’t too bright or too dim. Consistent and moderate light will prevent any issues when adding background scenes later on.
– Avoid Color Spill: Keep enough space between the subject and the green screen. This ensures that any reflected green light doesn’t land on the subject, avoiding color issues.
Common Lighting Mistakes and How to Avoid Them
A few blunders in setting up lighting can disrupt the quality of your videos. Recognizing these mistakes in advance helps you sidestep them easily. Here’s a list of common pitfalls and how to dodge them:
– Overexposure and Underexposure: Striking a balance in light intensity is crucial. Overexposed scenes lose details, while underexposed ones make it hard to capture fine details. Tweak your light sources and test until perfection is achieved.
– Inconsistent Lighting: Make sure your lighting remains uniform through the entire shoot. Sudden shifts in light can create jarring effects. Consider adjusting light fixtures periodically and recheck the lighting setup whenever you break between shoots.
– Shadows and Reflections: Keep an eye out for unwanted shadows and reflections that could mar your shots. Use diffusers or change the angle of your light sources to soften harsh shadows while maintaining clean and clear visuals.
Choosing the Right Equipment for Your Lighting Setup
Selecting appropriate gear can make your lighting setup more efficient and effective. Here’s what you might consider:
– Must-Have Lighting Gear: Look for softboxes, LED panels, and reflectors that fit your needs and enhance the quality of your video.
– Budget-Friendly Options: If you’re working with a tight budget, consider LED clip lights or ring lights. They offer good illumination without breaking the bank.
– Maintenance Tips: Keep your equipment in top shape with regular cleaning. Dust-covered lights can alter the brightness. Also, check cables and connections often to avoid technical hiccups during a shoot.
Wrapping Up Your Lighting Setup
Now that you’ve gathered a strong foundation in video lighting, it’s time to put it to practice. Proper lighting shapes how your audience experiences your content. Experiment with different setups and styles until you find what works best for your unique scenes.
With creativity and the right tools, perfect lighting isn’t just a goal; it’s entirely within reach. There’s always something new to explore and learn in video production, so keep trying fresh techniques and enjoy the process of creating standout visual content.
Ready to elevate your video production game? A well-set lighting design is crucial, especially when integrating a green screen into your setup. By mastering techniques like balancing exposure and preventing color spill, your videos can achieve that cinematic touch viewers love. For professional results, consider green screen rental to ensure seamless backgrounds and high-quality visuals. Killerspots Agency is here to support your creative journey.


No comment yet, add your voice below!